
For this tutorial, I’ll be exploring the cardboard box and the camera feature of the mobile phone to create a Rapid Prototyping Kit for Mobile AR. I thoroughly enjoyed prototyping to improve food options exercise that we did in class so I’ll be using it as an example.
Drawing a quick idea from grocery shopping, I designed a quick UI with 2D filter buttons for Non-GMO, Gluten-Free and No High-Fructose Corn Syrup. These buttons are represented by icon markers. The icon markers detects nutritional facts of grocery items, and will filter out what products are recommendable based on features set by the user.
Let’s get started!
What You’ll Need: (13.5 x 7 inch) Cardboard, Acetate Paper, Scissors, Cutting mat, 2 sharpies – Red and Black and a mobile phone.

Step 1 Prep all the materials
- Cut up the cardboard that will be used as a frame.
- I traced my iPhone 6 on a piece of paper, cut it up and determined the measurements of my stencil and traced it again on a cut-up piece of cardboard box. Using a box cutter, I cut up the traced lines as shown below.


- Cut up a long piece of acetate paper (upto 24 inches long) and ensure that it fits snug withing the sides of the cardboard frame (insert photo here)
Step 2 Prep the acetate to divide up the screens.
Create lines in between your screens by tracing the width allowable within the frame like so:

Using the red marker, add your filter buttons!

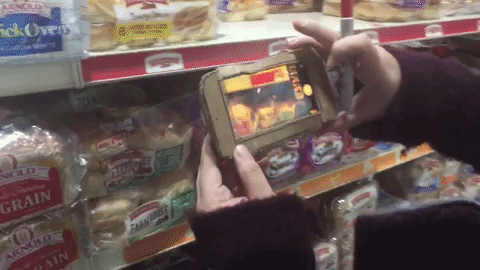
Step 3 Take a trip to the store and mark up your acetate paper as you go!

Insert your phone in the cardboard frame, open the camera app and add your pre-marked up acetate paper in!

Hover on the bread selection!
Slide your acetate paper and keep drawing assigned icons where appropriate.
